Baking with Banneton bread proofing baskets gives your dough a particular shape during proofing. Bannetons made from cane with spiral or line patterns accordingly leave beautiful rustic spiral and line shape as a print on the crust. Besides, bannetons help to slightly reduce the moisture of the dough, which creates a dry skin on the dough and so makes it easier to score. You can read more about what a banneton could bring to your kitchen here!

How to use a Banneton bread proofing baskets
Bannetons intend to supplement the proofing process of loaf making. Prior to putting your dough in the oven, a banneton helps to keep the shape of looser doughs or any dough that has trouble maintaining its mold. The idea is to transport the dough directly from the proofing basket into the oven so it doesn’t have time to lose its shape.
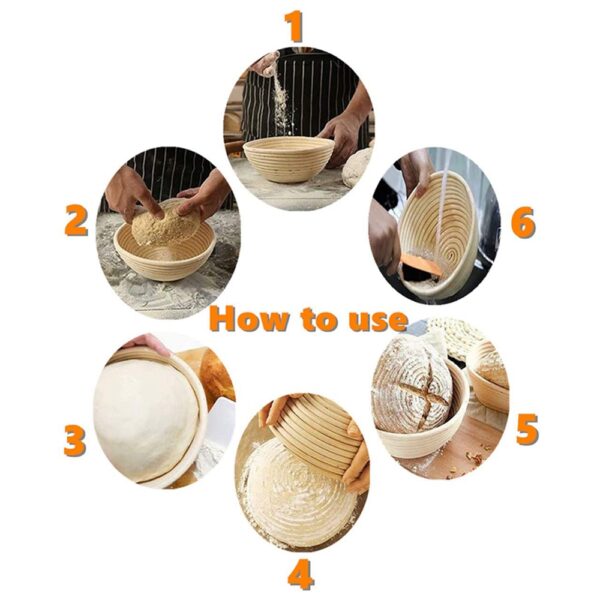
Great and beneficial as it is, bannetons are not difficult to make use of. Viettime Craft have enjoyed baking sourdough with our bannetons collection, will guide you through the steps of using a proofing basket:
Step 1: Decide whether you want to use the banneton with or without the liner
Coming with each banneton in Viettime Craft, there is a linen cloth liner – which you can choose to use or not. The difference that the liner makes is visible on the surface of the dough after proofing and, of course on the skin of your bread after baking.
If you decide to use the liner, your dough will come out in smooth and dry skin and it will be simple to score on the dough.
Whereas when you use the basket without the liner, beautiful lines (for rectangular baskets) or spiral patterns (for circular or heart-shaped baskets) will appear on the skin of your dough. These patterns give your final bread a super – rustic look and a touch of nostalgic homemade bread.

Step 2: Dust the bannetons with flour
Either you use your banneton with or without the cloth liner, flour dusting is unskippable. A layer of flour creates a non-stick surface for your bannetons, so that when you remove the dough after proofing, it will not be difficult and the skin of your dough is well- protected.
In case you use the banneton without the liner, you need to make sure the flour reaches and covers all the spaces between those lines of the baskets. That way, when you flip over the basket, the dough will easily fall out in great form and with beautiful, smooth skin.
Step 3: Put your shaped dough inside and let it rest
Pre-shaping your dough is important before you put your dough in the baskets. When pre-shaping your dough, remember not to put too much tension on it as you may risk pushing all the gas out. Lightly flour the tops of your shaped dough, cover it with a towel and let it rest for a little bit before once again shaping it to create a smooth surface.
After the final shaping is done, put your shaped dough in your flour-dusted bannetons for proofing. Put your loaf in the fridge-cool temperature slows down the final rise and gives your loaf more flavors as well as make it even easier to handle and score before being baked.

Just bear in mind that you shouldn’t overproof your dough, which may make the dough lose its structure and turn out unlike what you expected. The recommendable proofing time is around 3 hours.
Step 4: Clean and maintain your bannetons
You do not bake with bannetons – only use it for proofing. After proofing is done, flip over the baskets to take the dough out to the oven. Dust it off and it is good to go. Sometimes, your bannetons need washing – yes it is totally fine to wash your bannetons when required! Just don’t wash it with scented soap because there is a high chance that these smells will cling to your bannetons and then, your dough.
Store your bannetons in a dry place, away from the humid environment, and try not to stack bannetons directly on top of each other to avoid mold. Once in a while, you could leave your bannetons in direct sunlight for several hours so that they can dry out, making any previously moist flour easier to brush off.

How to Care for and Keep a Banneton bread proofing baskets
You officially know how to use a banneton, and even have the details on the initial conditioning process. But what happens when it’s time to store your banneton?
After removing the dough from your proofing basket and sending it the oven, you’re going to want to dry out your banneton for a day or so. Feel free to bask it in the sun for a few hours if possible to jumpstart the drying process. Brush any remaining dough particles with a dry bristle brush meant solely for banneton caretaking, then store in a ventilated area.
If you wish to clean your banneton, do so carefully and sparingly. Soak it in cold water for a few minutes, scrubbing it gently, and never use soap. Should you discover mold, simply bake it on low heat (115-130 degrees celsius) for a few minutes to kill the bacteria, then take it to an aerated storage space. If you’re really into sourdough and own multiple bannetons, we don’t blame you; just don’t stack them on top of each other when storing.
So that’s it, some simple steps you could follow when using a banneton in baking. Please follow Viettime Craft’s articles to update the latest information on rattan and bamboo products as well as interesting tips and advice to master proofing with banneton baskets!
See other product at our online Alibaba shop!
